
Monday, May 31, 2010
Feather Embroidered Bra
Balmain S/S 2010 Inspired Ripped Army Tee
Spending $1,625 on a ripped Balmain tee seems insane right? Well maybe not to some, and although I love Balmain, I have discovered a very easy, more-affordable way to get the look.
Start with an army green cotton t-shirt, try American Apparel's jersey tee in Army. To get the smaller holes, take a pair of pliers and slowly rip out pieces of fabric, trying to create frays and texture on the edges of the holes. I used pliers (and bit out some of the holes with my teeth) but you can use anything you find effective. Work in patches when making the holes, and try not to make them look too even or planned. After all the holes have been made, take a lighter and burn the edges of a select few of the holes. There you have your Balmain look for less. This army green tee looks great with a plum lipstick, try Yves Saint Laurent Rouge Volupté lipstick in Exquisite Plum.
DIY Nails
As females, manicures, pedicures, and the like has been part of our beauty routine for longer than we can remember. In early adolescence it was fun to play with color and try different designs on each of our nails, but now that we are older, it seems more appropriate to try one basic shade. However, we have come up with a new way to experiment with our nails while making it age appropriate by using a basic shade and adding a designer logo!
We tried two basic and well known logos and symbols in fashion that are known by almost everyone.
Chanel
Miu Miu

Items Needed:
Nail Polish Remover
Nail Clippers/Nail File
Base Coat of Nail Polish
(Any shade, but we chose Sinful Colors in Soulmate)
Top Clear Coat of Nail Polish
Our first step was to remove any previous polish with the nail polish remover and shape our nails with the clippers and file, accordingly. We had to start out with a clean slate.

Our next step was to paint our nails with the base coat. Let dry, and then repeat. Two coats would be preferable as it boosts the color and makes your nails really pop.

After making sure that both coats of nail polish are dry, we started on our designs. Becca chose to do the Miu Miu design on her nails, while I chose the Chanel logo. Both required a steady hand and many do overs, but here are the final results:
Becca
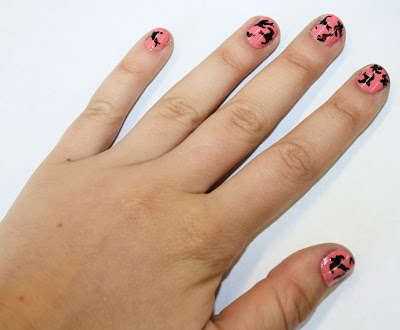
Shadee

This was a fun new way to do our nails without it being too over the top and it was completely inexpensive!
Subscribe to:
Comments (Atom)