Thursday, June 3, 2010

Jeans... Continued...

In addition to a studded pair of shorts, I also made a studded denim vest with leather shoulders.

Materials Needed:
Small studs
Leather belt left over from last project (minus the studs)
Levis denim jacket
Needle
Thread

The first step was to take the denim jacket and remove the sleeves by either cutting or using a seam ripper.


After that is done, you can place the studs on the front pockets and the collar. You can choose to place them elsewhere but this is how mine turned out:


After studding the denim vest, I took the belt leftover from the last jean project and cut it in half, removing the ends (buckle, etc). I sewed them into the shoulders to toughen it up even more.


Leg Jewelry

Who said chains are only for your neck and wrists? Lately, we have been seeing different forms of body jewelry in particular, leg jewelry. Lauren Santo Domingo was spotted sporting one of Litter's chain garters at New York Fashion Week, and Chanel's spring 2010 show included leg jewelry that was tattooed on (temporary of course). 
 
We DIY'ed our own leg jewelry using silver chain, feathers, a pair of needlenose pliers, wire clippers, 26 gauge wire (to wrap around the feather). We added a feather to one of our pieces, but you can be creative and use whatever you like.
 

Studded Jeans

Lately, a lot of attention has been put on jeans and studs. From a tough, bleached, and embellished look:

Balmain Spring 2009


To Chloé's softened up spring 2010 all jean look:


I wanted to try this out for myself, and the pictures that really inspired me were these, by Tommy Ton from Jack & Jil.


These are actually from BESS which has a wide range of studded jeans. They can be found here for approximately $275.

I started off with a basic pair of high waisted shorts for the summertime and cut them off a little shorter for a more frayed effect.


I then took a studded belt, like the one below, and removed all the studs by hand.


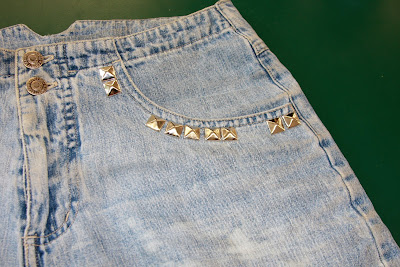
After this long and arduous process, I placed some studs onto the pockets by pulling the prongs apart, sticking them through the jeans, and closing them back up. Although they are harder to work with than studs you might glue on, they last a lot longer.


After the front was done, I did the back pocket by ripping half of the seam out so that there would be a flap as shown above. Then I put in rows and rows of studs until the whole pocket was covered.


The final step was to bleach the shorts for a more deconstructed and worn look. I did this by simply taking a sponge with Clorox Bleach on it and pressing it onto the shorts in different areas making sure that it was a little splotchy.
The end result was:

Front


Back

Monday, May 31, 2010

Feather Embroidered Bra

A bra is a part of every woman's life and daily wear, but lately there has been a large trend of exposed bras. Embroidered bras have been seen peeking out of the sides of loose, over sized racer-back tank tops. We embroidered a bra with feathers to create this look for less. You will need a a simple bra with no padding or lining, a needle and thread (same color as bra), and a bag of feathers (of your choice). When sewing each feather, take your needle and thread and loop the thread tightly around the tip of each feather at least 3 times before tying it off. Begin by sewing feathers one by one onto the outside of the cups of the bra, making sure the feathers overlap, start sewing the feathers from the inside out, sewing each feather underneath the already-sewn ones. Once the cups are covered in feathers, start with the band underneath the cups, and from there the bands all the way until the closure. This entire process is long, but it is well worth it!

Balmain S/S 2010 Inspired Ripped Army Tee

Spending $1,625 on a ripped Balmain tee seems insane right? Well maybe not to some, and although I love Balmain, I have discovered a very easy, more-affordable way to get the look.

Start with an army green cotton t-shirt, try American Apparel's jersey tee in Army. To get the smaller holes, take a pair of pliers and slowly rip out pieces of fabric, trying to create frays and texture on the edges of the holes. I used pliers (and bit out some of the holes with my teeth) but you can use anything you find effective. Work in patches when making the holes, and try not to make them look too even or planned. After all the holes have been made, take a lighter and burn the edges of a select few of the holes. There you have your Balmain look for less. This army green tee looks great with a plum lipstick, try Yves Saint Laurent Rouge Volupté lipstick in Exquisite Plum.

DIY Nails

As females, manicures, pedicures, and the like has been part of our beauty routine for longer than we can remember. In early adolescence it was fun to play with color and try different designs on each of our nails, but now that we are older, it seems more appropriate to try one basic shade. However, we have come up with a new way to experiment with our nails while making it age appropriate by using a basic shade and adding a designer logo!
We tried two basic and well known logos and symbols in fashion that are known by almost everyone.

Chanel


Miu Miu


Items Needed:
Nail Polish Remover
Nail Clippers/Nail File
Base Coat of Nail Polish
(Any shade, but we chose Sinful Colors in Soulmate)
Top Clear Coat of Nail Polish


Our first step was to remove any previous polish with the nail polish remover and shape our nails with the clippers and file, accordingly. We had to start out with a clean slate.


Our next step was to paint our nails with the base coat. Let dry, and then repeat. Two coats would be preferable as it boosts the color and makes your nails really pop.


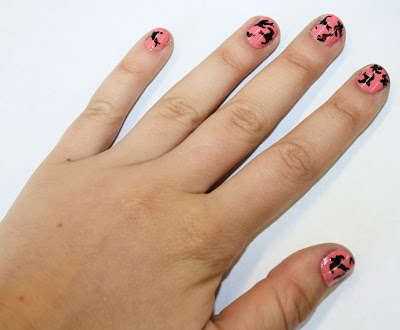
After making sure that both coats of nail polish are dry, we started on our designs. Becca chose to do the Miu Miu design on her nails, while I chose the Chanel logo. Both required a steady hand and many do overs, but here are the final results:

Becca


Shadee


This was a fun new way to do our nails without it being too over the top and it was completely inexpensive!